Saturday, September 21, 2013


MAGIC SCIENCE---WEEK 7


Our first magic science trick was listed in science web sites as easy for kids to do. We started our club week 7 with invisible writing. Instructions said to use lemon juice or milk to write on white paper. We did both and left them to dry as instructed.  Next we were to put the invisible writing up to a light bulb.  It didn’t work with a fluorescent bulb so we switched to a regular old fashioned light bulb. Nothing happened so we tried the next thing suggested in the instructions—a candle. I would not suggest kids do this as the paper started to burn but still no magic writing. Next Marius’s mother tried the gas stove burner.  This worked perfectly but I would not suggest a child do this. We tried different types of paper with the same results; it worked only with the stove.


Our next magic trick was to fill a sandwich bag with water and snap it shut.  The trick was to stab it with a sharp pencil and not have the water leak out. Marius tried it first. He stabbed it all the way through two layers but pulled the pencil out.  Leak city!  All the water came rushing out.  I explained that the pencil had to quickly go from one side of the bag to the other. Patricia tried and it worked.  Why? Because the bag is a polymer and as the pencil goes through the soft plastic seals itself around the pencil and the water doesn’t come out.  Next the kids wondered if more than one pencil would work and it did.  I have tried this trick with 5 pencils going through the same bag.  The trick is that the points have to be very sharp to be able tp push through the bags quickly.  This magic trick will have all their friends and parents amazed—just make sure it is done outside or over the sink.


 Making Magic marshmallows is every childs’ favorite trick. After I have shown this to the kids I am forever asked to make them-even my grandchildren, my classes, and the neighbors.  You need a microwave for this.  I use a paper cup cut to about ½.  Put marshmallows (one or two large ones) in the cups and put them in the microwave and watch them grow and grow.  The kids get so very excited! I will do 4 cups at a time.  Make sure the kids can watch. Again I ask them why.  The answer is because the marshmallow is whipped and is full of air.  The microwave works with steam which blows the marshmallows up as it heats.  As it cools the marshmallows collapse, and the kids eat them.  It works differently than marshmallows over a fire or grill.  The microwave cooks from the inside while the fire cooked marshmallows cook from the outside in.  Try it—it is the best and always works!  Even I love them.
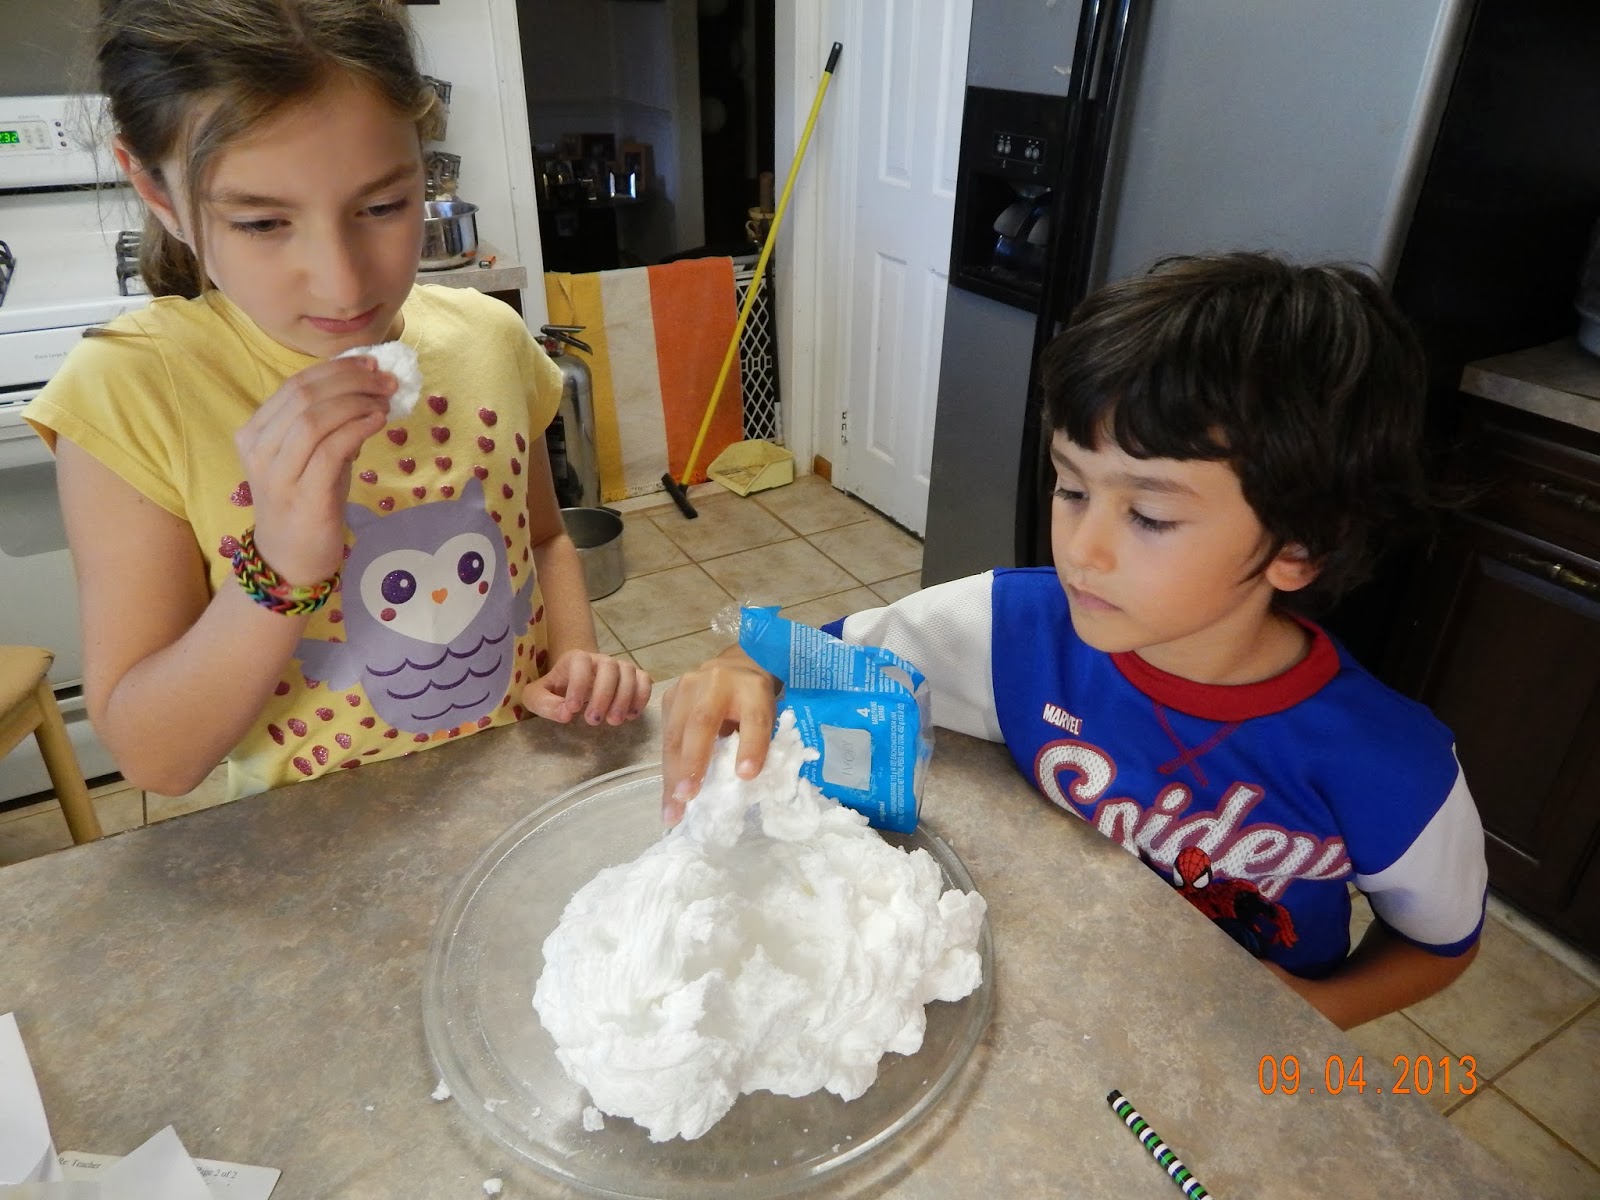


Have you ever cooked soap? For this magic trick you need Ivory Soap.  It is the only soap that will work.  It works on the same principal as the marshmallow.  Ivory Soap is the only soap that is whipped and again the microwave cooks with steam.  It steams up the whipped soap which grows and grows.  Kids love it!  When it comes out the soap sculpture is hard.  It is great for the grownups as the kids like to take the whipped soap and use it in their bath, it floats.  It also cleans your microwave.  Take water on a paper towel and wash out leftover soap.  Your microwave has never been so clean or smelled so good.  This is a win, win magic trick.


Wednesday, September 18, 2013


    Making Rockets  with Carbon Dioxide---Week  Six

 To make the rockets you need the white Fuji film canisters because of the way the cap closes. Since most people no longer use film, stores do not carry the canisters.  They can be ordered on Ebay or Amazon. To make rocketry more fun and to add a little scientific thinking and have a little artistic creativity, I had the kids design their own rockets using my scrap box.


  The fuel is water and an Alka Seltzer which will make carbon dioxide gas when mixed.

 On my art table (my kitchen table) I put feathers, colored string, colored paper, markers, scissors, coffee filters and scotch tape.  Do not use glue as it takes too long to dry and can make the canister too heavy. I gave the kids the task of thinking how their design could help the rocket fly higher.
The rocket hit the top of the porch.

  Some of the kids put the feathers facing down instead of facing upward toward the sky . Then we talked about how this could hurt the rocket from separating from the bottom cap. We also questioned whether the feathers would help the rocket fly higher like it does for the birds. My grandson David used a coffee filter as the parachute for the rocket to come down. Marius made wings on the side of the rocket to help it go up and then level. It was interesting to see how involved their thinking and designing became. Even the five year olds  put a lot of effort into their design. We went outside to try our rockets and to see if their designs helped or hindered.

For the first try we used about 1/3 water to ¼ of an  Alka Seltzer. The kids could really see how their design helped or hindered. Some had made them too heavy. We then went inside to improve on the rocket design. The ones who had feathers in the wrong direction changed them. Others added a parachute or wings. The  kids were very busy figuring out what would work


 The second launch we used 1/3 water and ½ of an Alka Seltzer.  I asked what the difference was. The response was it went higher because of the design and because the Alka Seltzer was bigger and made more carbon dioxide gas.  Lesson learned! I was so proud of them.


Look at the white over the house. That is the rocket higher than the house.
 

Next we tried to see if we could use the ingredients on the Alka Seltzer label to make the same results. The label says citric acid and baking Soda. We tried it but it didn’t work.

The excitement for each launch was so much fun. The kids really got into the designing and scientific reasoning.  Learning science does not have to be boring.  The next time I saw the parents they were still talking about how enthusiastic their children where about learning and creating such a fun scientific project. The parents said their children told them all about the project and what it proved. The kids talked about how they modified their rockets and how the different ingredients made more or less gas.  The club time exceeded 2 hours because the kids were so excited and involved in the project, I did not want to stop them.  Science is both exciting and creative, and it stops the kids from thinking they are stupid when their project or thinking is not like everyone else.  It teaches them to try and think and design on their own and when something doesn’t work—just try again to make it better.


Sunday, September 8, 2013

LIQUIDS IN SUSPENSION EXPERIMENTS


LIQUIDS IN SUSPENSION—LAVA LAMP

This week we started by my asking if anyone knew what I meant by liquids in suspension.  Anaka who is in 4th grade explained it was liquids in a bottle that didn’t mix like oil and water. She was right and we were going to prove it as we did our experiments.

1.      We started our by making a lava lamp.  We used any bottles we could find.  Some kids brought glass jars and others used water or soda bottles. All bottles or jars needed lids. Each child  filled the bottle with ¼  water and then filled it to over ¾ with oil.  Add a few drops of food coloring.  Do not mix the colors as they will blend together.  The first observation was that the food coloring dropped down to the water and did not mix with the oil.  If the bottle was shaken the food coloring would rise up with the oil like lava and then drop down.  We added ½ of an alka seltza pill to the bottle and all were excited about what happened.  It behaved just like a lava lamp that you buy in the store.  When the Alka Seltzer mixed with the water it dissolved and the food coloring and water drops  exploded up in the bottle. I asked why?  The kids had no idea. Alka Seltzer is just like baking soda and when it hits the water carbon dioxide gas forms pushing the water and food color up. The “lava” will stop after the Alka Seltzer dissolves but more can be dropped in.


             LIQUIDS IN SUSPENSION--PAINTING WITH MILK


      Our next project was to see what happens with whole milk, food coloring, and Dawn dish soap. We put enough milk to cover our tray. I used allergy needle trays, but any tray or saucer with sides will do. Next drop little drops of food coloring into the milk. The food coloring and the milk do not mix.  Take a Q-tip, dip it into the dish soap and put it into a drop of food coloring in the tray and watch it form patterns. This can be done over and over again to form new patterns. Now take a piece of paper, lay it on the designs in the tray and make it a print. Why didn’t the milk and food coloring mix?  The answer is that whole milk is a fat like oil and it stays in suspension until you add soap.


LIQUIDS IN SUSPENSION--OIL AND WATER


3.      Try the same experiment with oil, water, and  food coloring . T here is a famous painter who makes pictures out of this mix.Put only enough 
    oil to cover bottom of the tray.The colors will
     make a darker print.
4.      Just to try something else we added a small piece of Alka Seltzer to each tray and watched the carbon dioxide gas form bubbles and mix the colors.


Not only did the kids have fun doing these experiments but so did the parents who were here.  Many paper prints were made from the beautiful flowing patterns.


A special note—this can become very messy so cover all tables with plastic and newspapers to absorb the liquid. I had two of the kids get so into the project and the moving colors, they used their fingers to add soap to the colors. They were covered in messy soap paint.  Good thing it was soap so it washed out easily.


Monday, September 2, 2013


SOUND-- SCIENCE CLUB WEEK 4     


WHAT CAUSES SOUND?

  How do we and other animals produce sound? What about music, machinery, TV, etc. What causes the variations in sound? These are the questions I asked the group. Most of the Kids knew that vibrations cause sound and they had a voice box in their throats.  Our first experiment was our sound. I had each child put their fingers on their throats to feel the vibrations. We whispered, we shouted, we sung, and we talked to feel the difference in the vibrations.  The next question was why did we have different voices if we all had the same voice box and vibrations in our throat.  That was answered when we began our experiments.

1. Using a tunning fork at you use by hitting objects and putting the fork to your ear. Everything you hit has a different sound.


 2. Sound produced by different glass cocktail glasses. Some thin antique ones gave off a beautiful melodic sound and some heavier ones had a flat sound. We experimented hitting the glasses with wood, and metal utensils to produce different sounds. Then we added water to the glasses to try to make musical sounds.


3. I have a singing quartz bowl which is large and heavy. The ohm sound is made by taking a brass rod that is covered with suede material and rubbed around the top side of the bowl.  The sound gets louder and louder as you rub.


4 .My cousin had a ukulele which she played and showed how to tune by tightening the strings. She showed how the sound differed by the width of the strings and how she placed her fingers.  Then the kids all tried to make music. She also showed different wind instruments and how she blew into them and had to change her breath from light blowing to stronger blowing into the instruments to change the vibrations that made the sound.  I also had different sized native drums that the kids could hit to make different sounds and we explained about the different vibrations by hitting harder and softer.

5 .Singing Balloons- I had a bag of different size balloons and different size hex nuts. Each child picked the balloon and hex nut they wanted. We put the nuts in the balloon and blew it up and I tied the ends.  Then I had the children shake the balloon and listen to the sounds—it actually sounded like music.  We compared the different sounds the different sized balloons and the different sized nuts made. The kids were so excited that they wanted to try a few balloons each.  Then they asked to take one home to their siblings.


Scavanger hunt- I took every one outside to look for anything they could find to make music. Some used sticks, rocks, cans, buckets, and a couple of things in the yard I hadn’t thought of. One of the girls found my pitch fork and took a stick and hit each prong to make different sounds, and one kid thought of using my shovel.  They really got creative-my metal patio table was an instrument with a metal spoon hitting it.  As usual the children went beyond my expectations with their creativity.

7. Making our own string instrument-I had a box of different size wood pieces-some rectangular, some long and thin, etc.  I gave the kids a box of thin wood nails and different size and width rubber bands.  I thought they would just line the nails and strings like the ukulele to play music with—again they out smarted me.  Some of the kids not only went in one direction with the rubber bands, but others went across the original bands and added more than one for different sounds.


8. Cup and string phone- I had them make a string phone by putting a hole in the cups tie a paper clip to a long string and put the string thru the hole in the cup. Put the other end of the string into the other cup hole and tie it to another paper clip.  The paper clips are only to hold the string in the cup. Give the cups  to two children, have them pull the string tight and on child talks into the cup while the other one holds the cup to his ear. Than have them switch with the other child talking and the other holding the cup to his ear.


 Hands on experiments helps the kids learn concepts while having fun. Actually touching, seeing, and feeling these concepts makes a lasting impression while just reading about these same facts sometimes goes over their heads and out of the minds. They will always remember how they made their own instruments, how they were able to make the music with the glasses, and how the difference in the weight, length, and tightness can cause the differences in sounds, and it was a fun and painless experience.